Can I use bare linear rail for extruder?
As I collect parts to upgrade my printer, I am struck that the 450mm long MR12 linear rail I bought seems stiff. It’s not clear that I should bolt it to a length of 2020 extrusion, if all it is holding up is a few hundred grams of extruder and an MGN H carriage. Does anyone have experience building a corexy printer using linear rail itself for X, without the added inertia of bolting it to something else like 2020 extrusion?
The tronxy x5s comes with a 484mm long 2020 extrusion for X, but I can make up the missing 34mm in brackets for the ends. 17mm at each end… I was thinking I would carry the brackets through the first two or three holes in the MR12 at each end, but leave the middle unsupported. It feels like if I did that, I should mount it “on edge” so that the carriage mounting face is vertical, so that the stiffest axis is vertical. (I haven’t yet measured the flatness against my reference plate.)
I’ve invested in good ATP-5 tool plate for the bed, so if this would sag in the middle such that I could not achieve a trammed bed, that would be less than awesome.
(I’m more interested in experience, either real life or FEA, than simple guessing.)
Adam Steinmark May 10, 2018 23:32
I’m currently building a printer with genuine Hiwin MGN12 rails and a 2020 extrusion frame. Apparently the manufacturing process tends to bend the rail a very small amount and that it really should be screwed down onto a flat surface to keep it straight. A small curve might not seem like much and wouldn’t be noticeable to the eye but it could cause issues in your first layer and would shorten the lifespan of the carriage.
Manjush Patil May 11, 2018 00:21
Jakub Štajner May 11, 2018 03:03
Use 3 or 5 T-nuts and screw it tight to 2020 extrusion… more screws is better ;) I have delta printer with 300mm linear rails on 2020 extrusions and it works perfectly.
On Thingiverse there is “Linear Rail alignment helper”, that can help you center the rail on 2020 extrusion, because there is a small will in the T-nuts.
And read the Sumary before you tight all screws down to save time!
Good luck ;)
Linear Rail alignment helper for MGN12 + V-Slot 2020 by theinternal
Johan Jakobsson May 11, 2018 03:56
I’ve built a CoreXY doing just that, using a 250mm rail on the x-axis with no backing, just attached using a printed bracket that supports ~50mm at each end. Works well and it’s incredibly stiff so I doubt you’ll need to attach it to a 2020 extrusion for stiffness reasons. I’m running quite high acceleration & jerk and notice no ringing what so ever. I’m thinking that if the steelrods on a Ultimakrer are stiff enough a MGNR12 surely is too.
That might not apply to your build though since your rails are a lot longer and perhaps the direction you mount them also matters. Trucks facing upwards or sideways as I do. Guess you’ll just have to test it. =)
That said, the suggested practice from the manufacturers (hiwin, misumi et.c.) are that you bolt the rails down firmly to a stiff frame/beam.
Ps. ATM I’m printing at 60mm/s with 1500 acceleration and jerk (or junction_deviation as it’s called in smoothieware) of 0.15. Haven’t had the time to test it’s limits yet.
Michael K Johnson May 11, 2018 06:09
Thanks all! I hadn’t yet tried getting out blue to test flatness against my reference plate, and now I’ll probably keep using the 2020 — though it might be worth my comparing the flatness of the 2020 to the flatness of the rail against the reference plate, and it might be simply interesting to see how flat the rail (not genuine Hiwin) is. It does make sense that the linear rods were designed to be straight, and the rails were designed to be bolted to a reference surface.
The idea of using alignment jigs is great. I hadn’t thought of it before, and now I’m totally going to do that, though I might mill them from aluminum for tighter tolerances.
Michael K Johnson May 11, 2018 18:01
I have three pieces of rail; one for X and two for Y, all the same length. One is slightly out of flat in the thin dimension; two in the thick dimension. I expect that genuine hiwin is better. I haven’t disassembled the printer enough to compare to the 2020 yet.
Michael K Johnson May 11, 2018 22:20
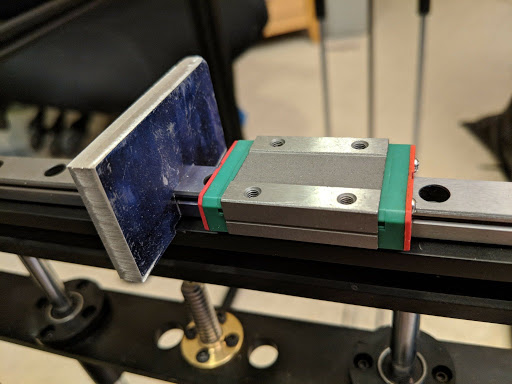
I substantially disassembled the printer, and the 2020 extrusion is clearly flatter than the linear rail; all four sides are a good fit against my reference plate. Glad I asked about my “good’ idea. Thanks again!
Michael K Johnson May 21, 2018 16:54
I milled precision aluminum jigs from ¼” plate. I milled a slot 20mm wide and a few mm deep, and then precisely in the middle of that slot a slot exactly 12mm wide and 8mm deep. They are tight enough that once I put them on they don’t move. Very nice for alignment, and definitely far more precise than anything I could print.
Johan Jakobsson May 21, 2018 17:57
+Michael K Johnson feel free to post pictures of your progress. Always interesting to see. =)
Michael K Johnson May 21, 2018 17:59
Michael K Johnson May 21, 2018 18:00
Ok, pictures… Silly Google won’t let me post more than one per comment…

Michael K Johnson May 21, 2018 19:41
I’ve been keeping a sort of occasional build log in comments at which wasn’t what I intended when I posted it but it kind of grew into a monster post.
Anyone here have a Tronxy X5S? The initial reviews were pretty much unanimous…
Michael K Johnson June 21, 2018 22:46
I used the jigs again while assembling the gantry from the plates I designed and milled. Reuse!
I’m slowly building a rather different printer on top of the skeleton of my T…
Imported from Google+ — content and formatting may not be reliable